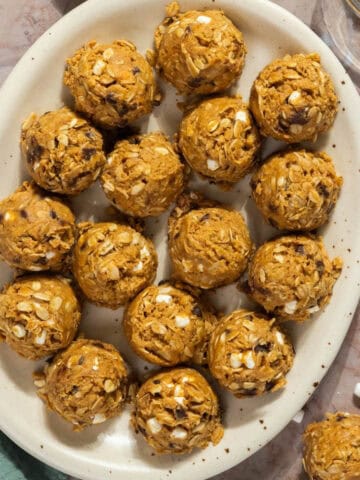
These peanut butter chocolate bliss balls require minimal prep time and only four simple ingredients to make. They have no added sugar and also include fat, protein, and fiber to keep you and your little ones feeling satisfied.

Jump to:
Why You’ll Love This Recipe
- While this recipe was created with your little ones in mind, these no bake bliss balls are the perfect snack for adults too! They resemble some of the popular snack bars, like Larabars* and Skout Bars*, but are easy to make at home and better on the budget.
- These energy bites require only four wholesome, plant-based ingredients that you may already have in your pantry.
- They make for the best easy snacks! Whether you need to mix up your afternoon snack, school snack, or have something to grab and go on busy days, a bliss ball recipe wins every time!
- They have no added sugar, and are packed with nutrients such as fat, protein, and fiber that will help keep you and your kiddos feeling full and satisfied longer.
- This is the first of our kid-friendly delicious recipes—looking forward to sharing more with you in the future! If you have questions about feeding bliss balls to your children, see the FAQ section below.
Ingredient Notes

- Medjool dates - we highly recommend using medjool dates as they create the perfect texture for these bliss bites. We have found that other types of dates can be harder, drier, and more difficult to work with. In addition to the consistency that the dates create, we also love that it provides natural sweetness. There is no need for the addition of maple syrup, honey, or sugar. If your dates are extra dry or sticky, consider soaking them in warm water for 5-10 minutes to soften them.
- Natural peanut butter - peanut butter provides healthy fats that are essential for a child's growth and development, particularly for the development of the brain. Fat also helps our bodies to absorb fat-soluble vitamins, which could not be absorbed without fat. We recommend using creamy peanut butter (or another nut or seed butter depending on preference) rather than raw nuts in this recipe. Raw nuts are a choking hazard for babies and toddlers and by using creamy peanut butter we reduce the risk of large chunks of nuts remaining in the bliss ball mixture. Please note that peanut butter on its own, because of its stickiness, is also a choking hazard (see more in our FAQ below). If you find the ingredients to be too sticky after pulsed together, add more coconut to make it less sticky.
- Shredded coconut or coconut flakes - we recommend using unsweetened coconut for this recipe. The dates provide the natural sweetness that these bliss balls need!
- Cocoa powder - the addition of cacao powder creates delicious chocolate bliss balls!
See the recipe card below for a complete list of ingredients and measurements.
Equipment You’ll Need
- Food processor (We have this mini food processor* and have loved it! We appreciate that it is a small appliance that doesn't take up too much space.)
- Measuring cups and spoons
- A plate or Tupperware container
Step by Step Directions
For the full recipe instructions, scroll down to the recipe card at the bottom of the page.

Step 1: Start by removing the pits from the dates, if needed. If your dates are dry or extra sticky, consider soaking them in warm water for 5-10 minutes to help them soften up. Add the dates, peanut butter, coconut, and cacao powder to the bowl of a food processor.

Step 2: Pulse the ingredients, regularly pausing to scrape down the sides of the bowl. For best results, continue to pulse until there are no large chunks of dates and the entire mixture is spinning smoothly. The processed ingredients should resemble a slightly sticky, paste-like dough.

Step 3: Next, take a tablespoon and use it to measure out the dough. Place it into your hands and roll it into the shape of a ball.

Step 4: Gently roll into additional shredded coconut if desired. If you do not want to make them into a ball shape, you can also gently press the mixture into the bottom of a Tupperware container and cut it into strips. Serve at room temperature or chilled, if you prefer a firmer texture.
Tips & Variations
- If you find that your dates are hard and dry, try soaking them in warm water for 5-10 minutes before putting them in the food processor.
- The amount of dates in the recipe can greatly affect the consistency. If you find that your dough is too crumbly to form into a ball, try adding one or two dates at a time or a little extra peanut butter to make it less dry. If you find the dough to be too sticky, consider adding a little more coconut to the mixture.
- If you are wanting to roll the bliss balls in shredded coconut, test a small amount to see if the coconut sticks. If it does not, you may need to add another date or two to the mixture.
- If you have a difficult time finding dates, dried apricots will also create a similar result to create apricot bliss balls.
- Peanut butter can be swapped out with another type of nut or seed butter depending on preference or your child's needs. You can try using almond butter or cashew butter. If your child has a nut allergy, you can make these easy bliss balls with sunflower seed butter or pumpkin seed butter instead.
- You can also add hemp seeds/hemp hearts, chia seeds, flaxseeds, and/or mini chocolate chips to the mixture. However, note that if these are added, you may need to add an additional date or a little extra peanut butter so that it does not become too dry or crumbly.

FAQ
The stickiness of the dates should help hold the mixture together. However, if your dates are hard or dry, the resulting mixture may not hold together. We recommend soaking them in warm water for 5-10 minutes before pulsing them in the food processor. If you find that the mixture is still dry, then consider adding a little more peanut butter as needed to bring the mixture together. It should only be slightly sticky, it should not easily stick to your hands.
We recommend storing them in an airtight container or Ziploc bag and placing them in the fridge. Note that the longer they are in the refrigerator, the more dry and crumbly they will become.
Absolutely! If you want to make a double batch and save some for later use, pop them in the freezer for up to 3 months (in an airtight container or freezer bag). Make sure they thaw completely before consuming.
Because dates are a choking risk and have a large amount of sugar in them, it is best to wait to offer them regularly until your child is about 18 months of age when biting, chewing, and swallowing skills are more developed. However, if modified appropriately to reduce the risk of choking hazards (see the next question regarding choking hazards below), it is okay to offer a taste here and there. Looking for other information about how to feed your baby? Check out our post on How to Feed Your Baby During the First Two Years.
Bliss balls contain ingredients that can be a choking hazard if not modified in a way to reduce choking risk. Both dates and peanut butter are sticky in texture and challenging to chew and/or swallow on their own. Dates also have pits that can pose a choking risk if not removed. To reduce the choking risk associated with dates, remove the pit and soak them in hot water for about 10 minutes to soften. Drain the water, then pulse them into a paste in a food processor (as done with these bliss balls).
We prefer to use peanut butter for this recipe as raw nuts are also a choking hazard for babies and toddlers. The peanut butter reduces the risk of large chunks of nuts remaining in the bliss ball mixture. The peanut butter, when combined with the other ingredients in this recipe, should not maintain a sticky texture. If you find that the overall mixture is very sticky, add a little bit more coconut to help dry it up. The mixture should be a little sticky, but not so sticky that it is easily sticking to your hands.
While bliss balls are round, they are larger in size, fairly soft, and break apart easily, reducing the choking risk from a round shape. Encourage your child to take bites rather than placing the entire ball into the mouth at once, you can model this for them. If you are nervous about giving your child a round object to eat, consider cutting the ball into halves or quarters or press the mixture into the bottom of a Tupperware container. Place the Tupperware into the fridge for 20-30 minutes. Then, cut the mixture into strips or squares and serve to your child.
For more information on choking hazards, skip to the Choking Hazards section in this post.
If your child is allergic to nuts, but not seeds, you can replace the peanut butter with the same amount of sunflower butter or pumpkin seed butter.
If you are making this for your baby or toddler, I recommend to avoid the addition of protein powder. Most babies and toddlers don't need as much protein in a day as you might think, so no need to turn these into protein balls. If you are offering a wide variety of foods each day, your child is most likely getting enough protein. If you are interested in learning more about this, here is an article from the Cleveland Clinic with more information.
Yes! These are gluten-free, dairy-free, vegetarian, and vegan bliss balls.
If you like this recipe, check out…
If you make these chocolate peanut butter bliss balls, please let us know how they turn out in the comments below and/or rate the recipe! Don’t forget to tag us on Instagram to show us your finished product—it makes our day every time we see you trying the recipes we love!

Bliss Balls
Ingredients
- 10 large Medjool dates
- ⅓ cup natural peanut butter
- ¼ cup shredded coconut + more for garnish if desired
- 1 tablespoon cocoa powder
Instructions
- Start by removing the pits from the dates, if needed. If your dates are dry or extra sticky, consider soaking them in warm water for 5-10 minutes to help them soften up.
- Add the dates, peanut butter, coconut, and cocoa powder to the bowl of a food processor.
- Pulse the ingredients, regularly pausing to scrape down the sides of the bowl. For best results, continue to pulse until there are no large chunks of dates and the entire mixture is spinning smoothly. The processed ingredients should resemble a slightly sticky, paste-like dough.
- Next, take a tablespoon and use it to measure out the dough. Place it into your hands and roll it into the shape of a ball. Gently roll into additional shredded coconut if desired. If you do not want to make them into a ball shape, you can also gently press the mixture into the bottom of a Tupperware container and cut it into strips.
- Serve at room temperature or chilled, if you prefer a firmer texture.
Notes
NUTRITION
The recipe can be found on My Fitness Pal by searching "BWB Bliss Balls."
The nutrition content provided for each recipe is an estimate created through the My Fitness Pal database. Please be aware that the nutritional content of each recipe may vary based on the products you use, the precision of your measurements, and the source you use to obtain nutrition data. While we try to provide accurate information, we give no guarantee regarding the accuracy of the nutritional information provided.
Please note that this website does not provide medical advice. Any content provided by Begin With Balance is for informational purposes only and is not to be used as a substitute for medical advice or as diagnostic or treatment information. The information that is provided by Begin With Balance is created for a generalized audience. We understand that you or your child may have individual needs that are not considered in the information we provide. Begin With Balance does not provide professional advice to any users or their families. If you choose to engage in the information provided on this website, you do so at your own risk. Begin With Balance is not responsible for any adverse event that may result from engaging with our content. By using this website, you accept the responsibility for your own health and your family’s health. Please seek the advice of your specific medical or healthcare professional with any questions you may have regarding your health or your family’s health.
*Affiliate link


Emily B
Love this recipe! The perfect amount of sweetness and my toddler loves them too. Will definitely be making these again.
[email protected]
Happy your toddler loves them! Such a good snack for the kiddos!