This kids charcuterie board is a fun spin on the traditional charcuterie board! We know it can be intimidating to come up with the perfect board, so this post will take you through a simple step-by-step process. The most important thing is that you have fun with it! This board is customizable to your child's specific needs whether that be their age, food allergies, or level of food acceptance. It is the perfect way to introduce new things to picky eaters in a fun and low pressure environment! You'll also find some additional tips and tricks in this post from a Registered Dietitian!

Why You’ll Love This Recipe
- Our favorite thing is that this is an easy charcuterie board to assemble and put together! We'll guide you through the process of how to make a charcuterie board for kids.
- It's a great opportunity to practice the division of responsibility. See more on this in the tips section below and read more about helping picky eaters here.
- This kid's charcuterie board provides a great opportunity to eat together with the whole family. One of our favorite ways to spend time together as a family is to eat yummy foods!
- It is customizable and can be easily adapted to different ages, developmental stages, and dietary needs as necessary.
- It is a great option for an after-school snack, for easy weekend snacking, to feed a group of kids coming over to your house, for game nights, as a favorite party food, or for special occasions such as a birthday party or holiday where you can tailor it to a specific theme. See the tips and variations section for a few charcuterie platter ideas.
- You can pack leftovers for an easy lunch the next day.
- While we give a lot of recommendations for how to make this the perfect kid charcuterie board, it is great for adults too!
Ingredient Notes
There are a lot of ingredient options when it comes to preparing a toddler-friendly charcuterie board. We will show you an easy way to determine exactly what you will need!
We recommend including foods from at least three food groups when creating a charcuterie board. Ideally, we'd like to include a source of carbohydrate, protein, fat, and produce/fiber at every meal. Carbohydrates are the gold standard of food energy for the body—they provide the body with its main energy source. Additionally, the brain, nervous system, and red blood cells rely on glucose for energy. We need carbohydrates to stay alert and active throughout the day! Protein, fat, and fiber are great to pair with carbohydrates as they also help us to feel satisfied and fuller for longer.
Below you will see a list of options for different food groups and macronutrients that you can include in your kid friendly DIY charcuterie board. Note that this is by no means an exhaustive list, so feel free to add something you and your family love that might be missing from this list! A lot of these options are often seen as kid-friendly foods or snack foods, but we have also tried to expand the options to include things you might not think of right off the bat that would be a great addition to an excellent snack board or well-rounded meal.
Modifications
While this charcuterie board is intended for school-age children, we know that it is so much fun to include the whole family, even if younger kids are involved! Therefore, it is important to keep in mind whether or not your child will need modifications to any of the foods on this list. Remember that common choking hazards can remain a risk even up to 4 or 5 years of age depending on development and maturity of feeding skills. Common choking hazards are typically food items that are hard, round, sticky, slippery, or really chewy. Take a look at this post for more examples of foods that are choking hazards. These foods may need to be avoided all together or modified to make them soft, fine, no longer spherical in shape, or an appropriate size (think little bites!).
Some notes for modifications are listed below, but please note that this list is not comprehensive to modifications that may be needed for all stages. The pictures shown in this post also do not account for all modifications. If you have more questions about how to modify foods to be safe for your baby, we love the Solid Starts app! You can search a food and they will tell you the best way to offer it based on age, or recommend that you wait to serve it until your child is older.
Carbohydrates
- Dry cereal
- Sliced bread
- Mini waffles, bagels, or muffins
- Energy bites (see our favorite bliss ball recipe here)
- Crackers
A note on crackers: if crackers resemble the texture of a chip (are hard, crunchy, and do not dissolve easily) or are filled with lots of whole seeds, it may be better to wait to introduce these until your toddler is older as they can be a choking hazard.- Multigrain Crackers from Trader Joe's - We love these crackers! They are a softer cracker that dissolve more easily in the mouth, making it perfect for those who are just starting out with crackers. It comes in a white box with green lettering. If you don't have a Trader Joe's near you, another good option is the Breton cracker, Ritz Crackers, or teething crackers*. These will be the best option for younger toddlers since they can gum them down and they will dissolve fairly easily.
- Graham crackers - if your child is <1 year, consider waiting to introduce graham crackers. They contain honey, which isn't recommended to children <1 year of age, even when cooked.
- Goldfish, cheddar bunnies
- Animal crackers, Teddy Grahams, Bunny Grahams
- Ritz Crackers
- Cheese or peanut butter sandwich crackers
- Simple Mills sweet thins crackers*, Simple Mills almond flour crackers*, or Simple Mills Pop Mmms* (these are a good option for gluten-free homes). Note that the almond flour crackers are hard and do not dissolve very easily. These may be better suited for older toddlers.
- Wheat Thins
- Triscuits
- Cheez-It crackers
- Chips - best suited for older toddlers as they are a choking hazard.
- Puffs
- Peanut puffs, such as Bambas, are a great way to introduce peanut to your child.
- Finger food puffs such as Happy Baby Puffs* (can also find at Target and likely your local grocery store).
- Snap pea crisps or veggie straws
- Mini rice cakes
- Small pieces of granola bars (Larabars*, Skout bars*, Z Bars, Nature's Bakery fig bars*, Gerber soft grain baked bars, etc.)
- Pretzels - thin sticks are easier to eat for younger kiddos!
- Pasta
- Rice
- Oatmeal
- Beans - also contain protein!
Protein
- Cheese - choose whichever type of cheese your kids prefer! Cheese slices, cheddar cheese cubes, or even blue cheese if your child is feeling adventurous! If you are serving string cheese, pull it into shreds rather than cutting it into rounds for your little ones (the small rounds are a choking hazard).
- Hard boiled eggs - these are super easy to prep at the beginning of the week and store in the fridge until you are ready to use them. You can cut them into slices or serve them as deviled eggs to make them more of a finger food for the charcuterie board.
- Low sodium deli meats/charcuterie meats - think homemade Lunchables! Thinly sliced turkey, ham, or chicken are an easy way to get in some protein.
- Beef jerky or jerky sticks - these are better suited for older toddlers as they are super chewy and can pose a choking risk.
- Shredded chicken
- Fish sticks
- Meatballs - give our recipe for turkey meatballs a try and swap the spicy buffalo sauce for a milder sauce, or leave out the sauce all together.
- Beans - as mentioned above, beans contain both carbohydrates and protein, so are the perfect way to get in a combination of the two! Canned beans are a very convenient and affordable source of protein. Simply drain and rinse them before serving.
- Edamame - consider smashing them for babies just starting out on solids or choosing an edamame hummus. Older toddlers can eat them whole or straight out of the pod.
- Nuts or seeds/nut or seed butter - whole nuts and nut butter are choking hazards, so are best offered once kids are older or should be modified. For older kids, trail mix or peanut butter are great options to get in some protein and fat (another great idea for a combo food!). For younger babies, try spreading a thin layer of nut or seed butter on a piece of toast or mix a small spoonful into some whole fat plain yogurt.
- Hummus/chickpeas
- Yogurt - while Greek yogurt is higher in protein, many yogurts have protein in them. They also contain carbohydrates, so are another good combo option.
Fats
- Avocado - this can be served as guacamole, diced, or sliced depending on your child's age.
- Olives - it is best to wait to introduce olives until your child is at least 1 year and to modify it by slicing them or quartering them lengthwise.
- Nut and seeds/nut and seed butter - see above, under Protein.
- Whole milk dairy - whole milk dairy is recommended for toddlers because the fat from whole milk is still needed for their developing brains. It also helps them to get the energy they need throughout the day! Milk, yogurt, and cheese are all examples.
Fruits
- Fresh fruit such as berries, banana, thin apple slices, halved or quartered grapes, watermelon, clementine segments, kiwi slices, slices of pears, peaches, or mangoes (very ripe and soft!).
- Canned fruit (preferably in 100% fruit juice) or thawed frozen fruit
- Freeze dried or dried fruit - some examples include raisins or freeze dried strawberries, bananas, or cinnamon apples.
- That's It fruit bars* - you can also find these at Costco. Trader Joe's has their own similar version as well.
- Fruit rolls or fruit leathers - these are typically chewy, sticky or hard to chew and may be better introduced later on.
Veggies
- Thinly sliced cucumbers or bell peppers (or mini peppers)
- Snap peas
- Baby carrots, carrot chips, or shredded carrots
- Small florets of broccoli or cauliflower
- Halved or quartered cherry tomatoes
- Pickles
- Thawed frozen veggies
- Canned veggies
Dips
- Fruit dip (such as our toffee apple dip)
- Fruit salsa
- Yogurt mixed with nut butter
- Nutella
- Pudding
- Hummus
- Ranch dip
- Guacamole
- Salsa
Fun foods
We love serving "sweet treats" with a meal or snack! It is a great addition and there are a lot of benefits to offering them in this way. When a dessert or fun food is offered with a meal or snack, it can help reduce the novelty that those foods have and put all foods on a level playing field. Rather than having to eat some of their other foods in order to get dessert, it's offered alongside those foods.
This also gives the child an opportunity to tune into their internal cues and choose what feels best to them rather than racing through dinner (or refusing it) to get to dessert. Sometimes they may eat several of these foods, and other times they may eat a small amount or none at all. All are perfectly normal! Additionally, when we provide these foods on a regular basis, it helps our child to trust that they can have it again and not feel like they need to eat as much as they can in that moment.
- Chocolate chips
- Mini marshmallows
- Mini cupcakes
- Oreos
- Fruit snacks
- Frosted animal crackers
- Small cookies
- Mini vanilla wafer cookies
Equipment You’ll Need
- A large board, platter, plate, muffin tins, or ice cube trays depending on how you want to present it
- Small bowls for any dips or foods that otherwise might roll off the board.
- Cutting board and knife if needing to prepare food items
Step by Step Directions
There is not one right way to make a childrens charcuterie board—the options are endless! To make this the easiest charcuterie board to assemble, we have included a few simple steps for you to follow.
- Choose your ingredients and prepare them if needed. Modify for younger children if necessary. We recommend choosing a carbohydrate, protein, fat, and produce/fiber-containing food. Include a fun food!
- Pull out a charcuterie board, cutting board, platter, or baking sheet to arrange the food on (or serve on individual plates if you aren't serving it family-style).
- Put any dips or sauces you want to include into small bowls (such as ramekins or pinch bowls). Place them scattered across different areas of your board.
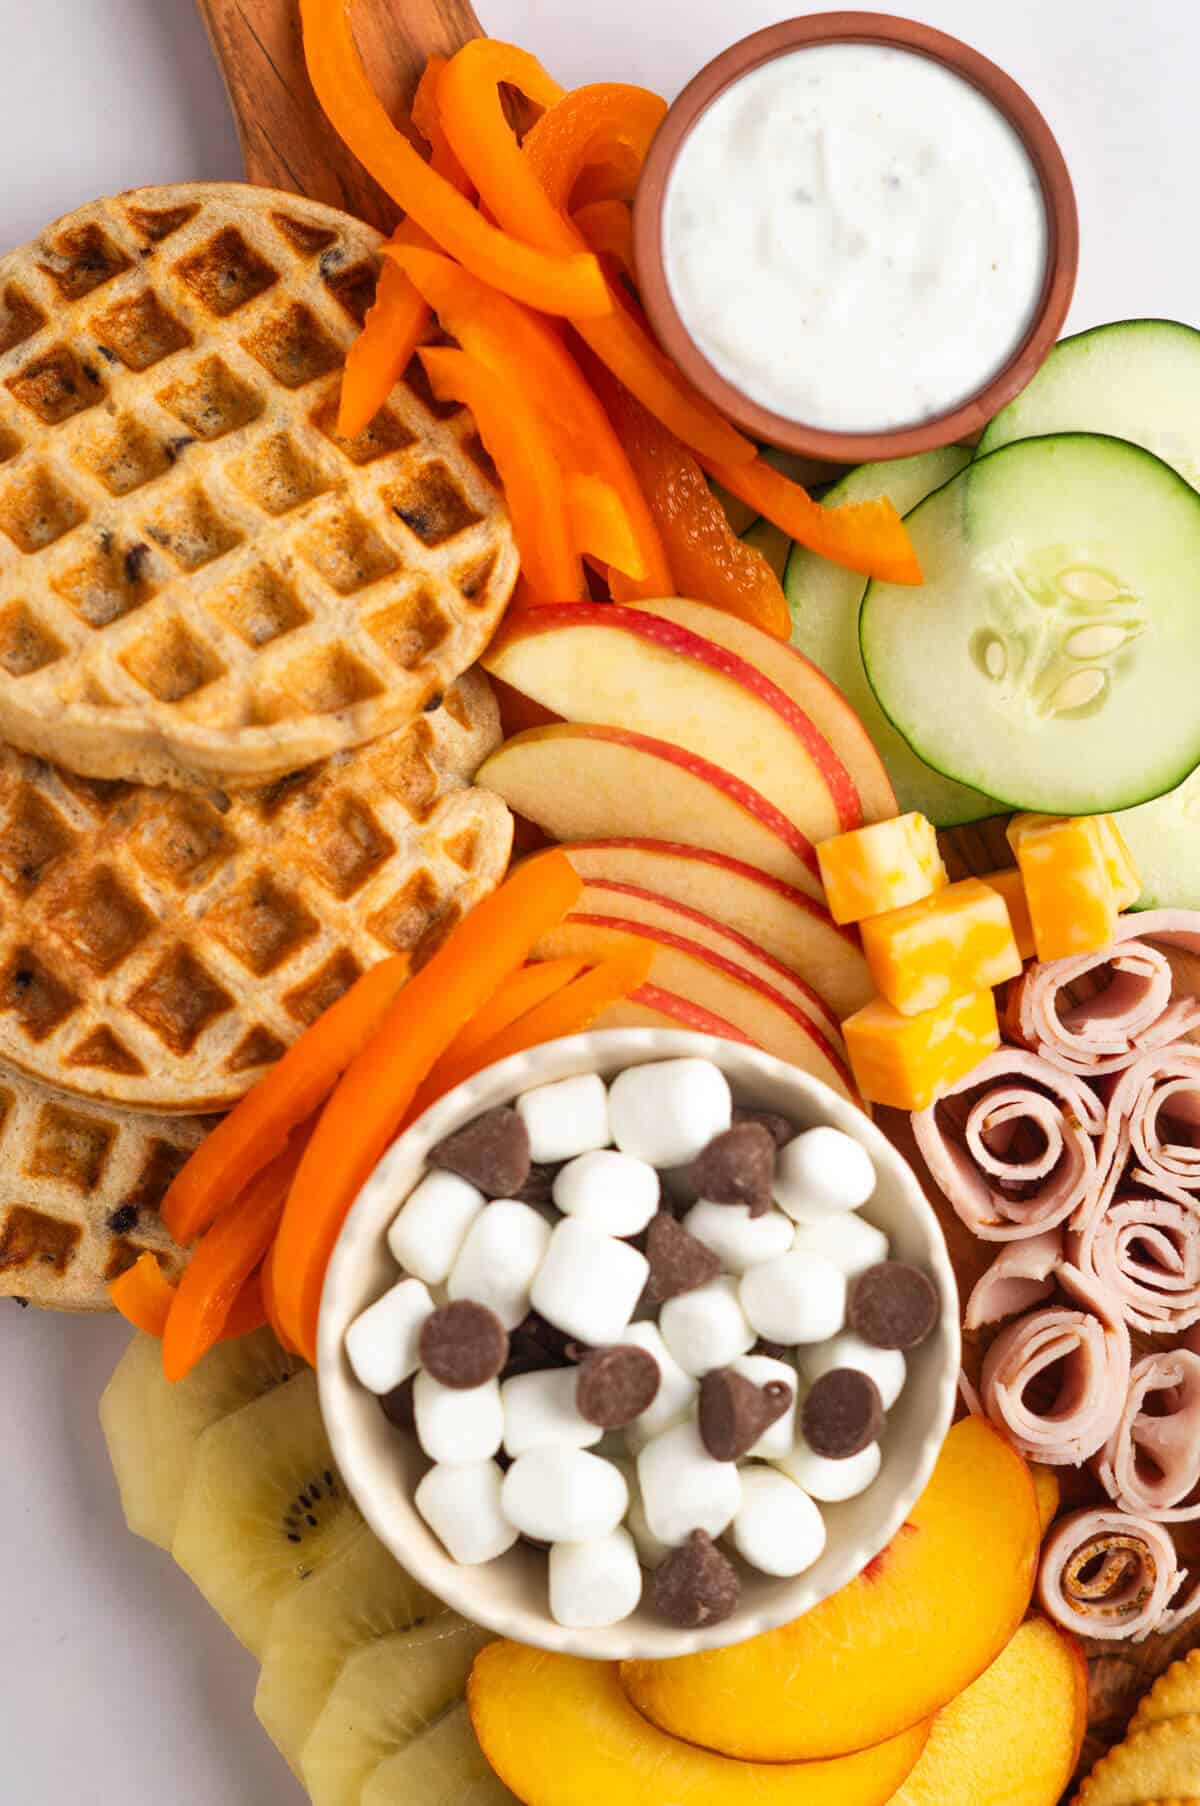
- Use your creativity to organize the board or let your kids help! Again, there are multiple "right" ways to do this! Start by adding the largest items to the board and work towards adding the smallest items. One example of how to do this is to first start with cheese, then meat, then crackers, then produce. Group each item in a little cluster or row on the board to fill it out as desired. See the photo for an idea on how to do this!
Tips & Variations
- As mentioned above, this charcuterie board presents a great opportunity to practice the Division of Responsibility. Division of Responsibility (DOR) is a term coined by Ellyn Satter. She is a Registered Dietitian, family therapist, and internationally recognized authority on eating and feeding. The DOR is the gold standard for feeding children and clearly divides the feeding and eating responsibilities between parent and child. It encourages parents to take charge in the what, when, and where of the feeding and the children to determine how much and whether to eat what you have provided. Following the DOR provides structure/boundaries, autonomy, and builds trust in the parent-child feeding relationship.
- Try your best not to comment on what your child is eating or push them to eat certain things. Let them take the lead in determining how much they will eat and whether they will eat the foods offered. It is a great opportunity for them to explore different colors, different textures, and different flavors.
- If you want to introduce your child to a new food, this is a great opportunity to do so! It's always helpful to introduce a new food with foods that are familiar and safe.
- If you don't want to serve everything on one big charcuterie board, or if you have young children who are at different developmental stages and need modifications for the food preparation, you can always serve individual snack plates on smaller boards or plates. It's also fun to serve in muffin tins!
- One way to make this kid friendly charcuterie board even easier is to prepare all of the foods at one time. For example, you could cut up cucumbers and bell peppers, make energy bites/bliss balls, make hard-boiled eggs, make a dip, or make a fun food all on one day then store them in individual containers in the fridge until you are ready to use them. Then come snack time, all you need to do is pull it out and put it on the board.
- If you are worried about waste, we have a simple idea to prevent it. Place any uneaten food into separate Ziploc bags or airtight containers for storage. Now you have snacks ready for the next few days! This also makes it really easy to take a snack on the go if needed. Another great idea is to use the leftover food items for school lunches the next day.
- You could always use cookie cutters to cut out fun shapes in items such as cheese slices, bread, melons, apples, or cucumbers. While using different shapes like this isn't necessary, it's a fun way to mix up the way finger foods are traditionally served.
- One great thing about this recipe is that there are a lot of fun charcuterie board ideas you can try! You could do a breakfast theme, a board tailored to different holidays like Valentine's Day, Easter, Halloween, or Christmas, or a board for a birthday with your child's favorite foods.
- Feel free to add some fresh herbs for a fun garnish!

FAQ
We recommend to store the items individually in airtight containers and in the refrigerator where necessary. Doing so makes it really easy to pull together the perfect snack the next time you need one. You could also use leftovers to pack a lunch for the next day!
It is recommended that foods such as meat and cheese do not sit out at room temperature for longer than 2 hours. If your charcuterie platter has perishable items, make sure to put them back in the refrigerator within the 2 hour timeframe.
You can find charcuterie boards in many places! Anywhere from Amazon, to Home Goods, to Target. There are so many options! Circular* or rectangular* boards, a large board or smaller boards. However, don't feel like you have to have a good charcuterie board to make this fun snack board happen. You can use what you already have on hand as well whether that be a large plate, a platter, a cutting board*, muffin tins*, or a baking sheet.
This will depend on the items selected for the charcuterie board. The best part is how customizable it is! If someone in your family has allergies that you need to account for, you can easily choose items that meet these dietary needs and preferences.
Did you like this recipe? Check out some of our other fun snack ideas!
If you make this easy kid-friendly charcuterie board, please let us know how it turns out in the comments below and/or rate the recipe! Don’t forget to tag us on Instagram to show us your finished product—it makes our day every time we see you trying the recipes we love!

How to Make a Kid-Friendly Charcuterie Board
Ingredients
- Only a few options are listed here, see the blog post for more ideas and for notes on modifications!
Carbohydrates
- Dry cereal, crackers, pretzels, energy bites/bliss balls (recipe for bliss balls here)
Protein
- Cheese, deli meat, hard-boiled eggs
Fats/Dips
- Avocado/guacamole, yogurt mixed with nut butter, ranch dip
Fruit
- Berries, bananas, thin apple slices, kiwi
Vegetables
- Cucumbers, bell peppers, carrots
Fun Foods
- Chocolate chips, mini marshmallows, Oreos
Instructions
- Choose your ingredients and prepare them if needed. Modify for younger children if necessary. We recommend choosing a carbohydrate, protein, fat, and produce/fiber-containing food. Include a fun food!
- Pull out a charcuterie board, cutting board, platter, or baking sheet to arrange the food on (or serve on individual plates if you aren't serving it family-style).
- Put any dips or sauces you want to include into small bowls (such as ramekins or pinch bowls). Place them scattered across different areas of your board.
- Use your creativity to organize the board or let your kids help! Again, there are multiple "right" ways to do this! Start by adding the largest items to the board and work towards adding the smallest items. One example of how to do this is to first start with cheese, then meat, then crackers, then produce. Group each item in a little cluster or row on the board to fill it out as desired. See the photo for an idea on how to do this!
The nutrition content is not provided for this recipe given that it will vary greatly depending on the food items that are selected for the charcuterie platter.
*Affiliate links
Please note that this website does not provide medical advice. Any content provided by Begin With Balance is for informational purposes only and is not to be used as a substitute for medical advice or as diagnostic or treatment information. The information that is provided by Begin With Balance is created for a generalized audience. We understand that you or your child may have individual needs that are not considered in the information we provide. Begin With Balance does not provide professional advice to any users or their families.
If you choose to engage in the information provided on this website, you do so at your own risk. Begin With Balance is not responsible for any adverse event that may result from engaging with our content. By using this website, you accept the responsibility for your own health and your family’s health. Please seek the advice of your specific medical or healthcare professional with any questions you may have regarding your health or your family’s health.


Leave a Reply